Up and running
This section will explain how to upgrade and get your Cambridge Z88 working for you as soon as possible. Once you have tried out the simple examples in the next few pages you should have a feel for what the Cambridge Z88 can do for you, before proceeding to the later sections at your leisure. There are some important sections that need to be understood, they are: Switch On/Off, Using an External Flash Card, Changing keyboard layout, Set the Default Device and Using an External Flash Card.
Z88 Survival Kit
There are four items that the acute Z88 user should have handy for emergencies.
Storage Device | |
|---|---|
| Flash or EPROMs should be used to backup important data. |
Set of batteries | |
| These always seem to fail when you don't want them to. |
Mains Adapter | |
| Handy to use when you are near a mains socket. |
Paper Clip | |
| Small but effective to reset the Z88 if it becomes unresponsive. |


New Z88
For those of you who have never seen what a new Z88 in the box looks like, here it is.
| The Box | |
|---|---|
 | |
Box and Sleeve | |
 | The sleeve exposes the plasticized cardboard box |
Carrying Handle | |
 | with a carrying handle that invites it to be used with the Z88. |
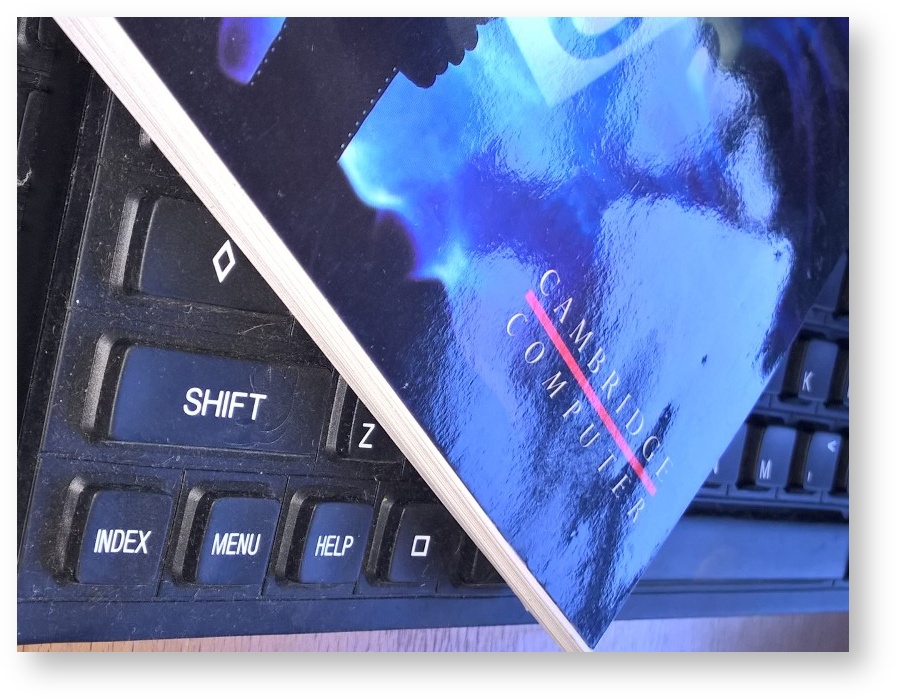
User Guide | |
 | is stored in a separate section. There were 4 versions. The copy shown here is version 4, which is what this User Guide is based on. |
Protection | |
 | There is an A3 sheet of paper wrapped around the front edge of the Z88. This is to protect the rubber keys from being damaged. There are the Z88's "Start Up" instructions on the opposite side. |
WARNING | |
 | Should you decide to use the box with the Z88, make sure you do not insert the Z88 as shown. The cardboard box can catch the rubber keys and shear them off quite easily. The UK keyboard mat is no longer available. Either use the protection sheet, or do not use the box for general use. The carrying case is a lot softer and is a better option to use. |
Fitting batteries
Check Batteries Although we like to think that when we buy a new set of batteries they are at the working voltage, this is not always the case. Prudent Z88 users check them before using them. | |
 | To run the Cambridge Z88 you will need the following batteries:
Other types of the same size can be used in an emergency, but we recommend the use of the leak-resistant alkaline type as these will keep your Cambridge Z88 working for longer without needing replacement. With these batteries an unexpanded Cambridge Z88 will give about 20 hours of active computing, and the data will be preserved in the machine while it is switched off for up to a year. For heavy indoor use the mains power unit is recommended. Note that the procedure described here is not the same as the one for replacing existing batteries. In this case refer to Appendix A. |
Inserting the batteries
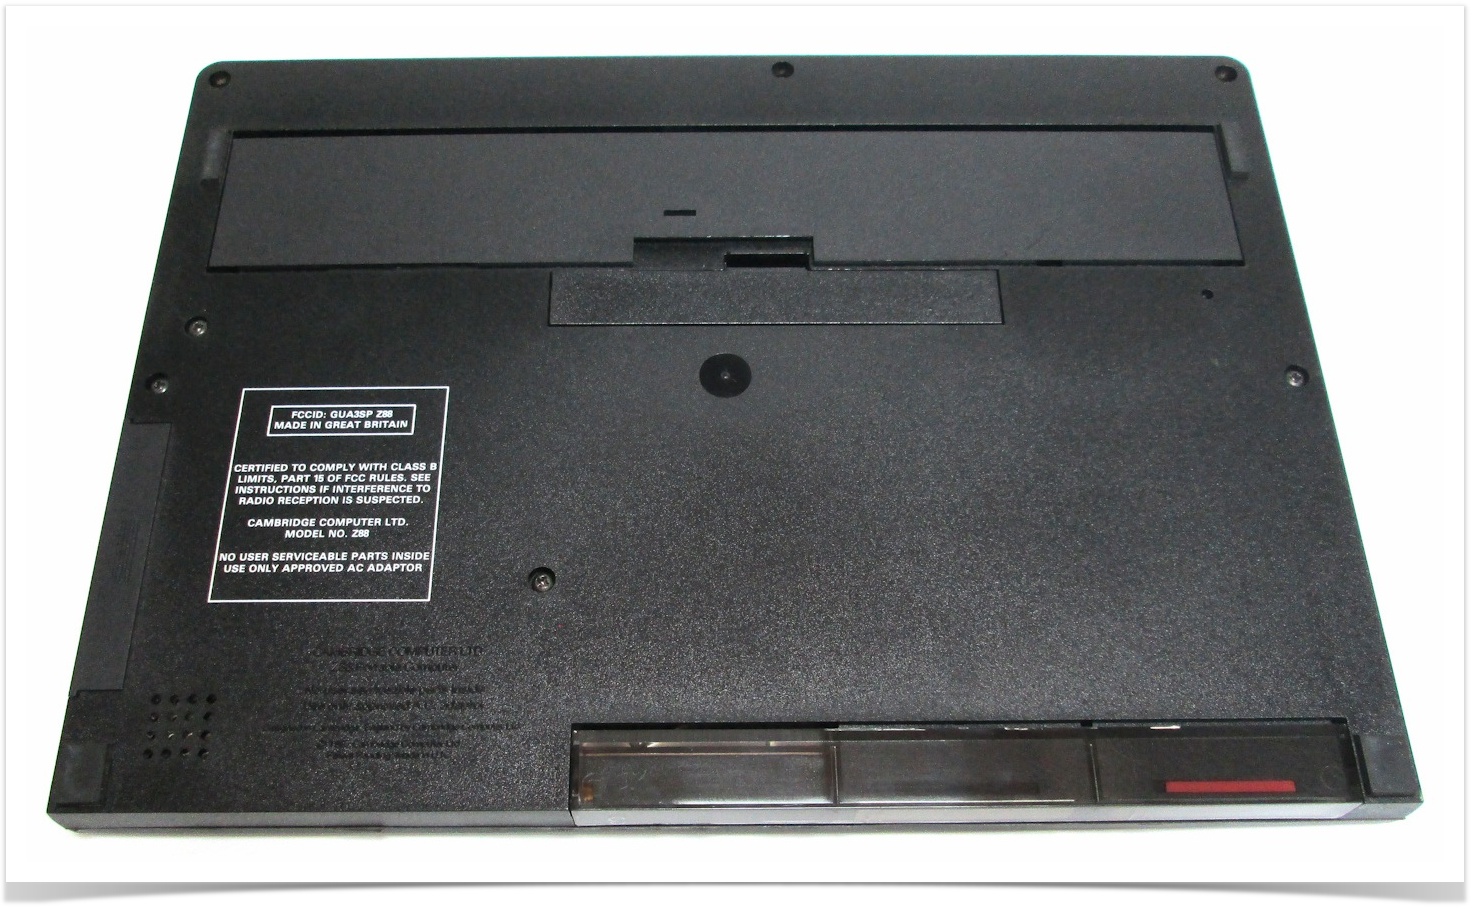
The four batteries are housed in a row in the battery compartment, under a flap on the rear of the Cambridge Z88 case.

To insert batteries for the first time, use the following procedure:
- Remove the cover from the battery compartment on the back of the Cambridge Z88 case, and insert one battery at each end of the compartment.
Make sure the batteries are fitted the correct way round, as indicated by the diagram in the battery compartment. - Insert the remaining two batteries to make an 'A' shape above the case. Make sure that all four batteries are facing in the same direction, with the correct polarity.
Then push down on the two batteries so that they click into place. - Replace the battery compartment cover firmly.

Switch On/Off
There is no On/Off switch. The Z88 is always on, but to conserve power the display can be turned off and the Z88 is put into dozy mode.

To switch the Z88 on or off press both  keys simultaneously.
 | Leave Keyboard Clear of items. When the Z88 is OFF i.e. in sleep mode, the Z88 wakes up if a key is pressed to check if they are the two Shift Keys. |
Display Screen Area
For those of you that are used to working with large monitors this screen may seem small but because of the ingenious and economical way the system uses the available space, you will find that the size will not inhibit its use.
Immediately below the display is a list of commands together with the control key and code needed to action them. These are useful reminders for beginners but once the comprehensive internal MENU(s) are used, they show and allow selection all the commands that may be used at that point.
The built-in OZ operating system and external cards
The standard Cambridge Z88 has all the operating system and software pre-installed, named as OZ - ready to be run when the machine has been initially reset, leaving the external slots free for more RAM or to install applications or memory cards for files. All internal ROM versions originally released by Cambridge Computer in 1990 (final release was V4.0 UK) are a lower version number than the one available now. When the Z88 is given a HARD RESET, the first thing the operating system checks is whether there is a program is available to run from Slot 1. It is that technique that is used when using an external card.
Flash Card example
When Rakewell supplies Flash Cards, there are additional applications and extra files loaded in the file area.
Impatient users may elect to skip the detailed description on how to use these cards in this manual initially as the example illustrates some useful techniques which the first-time user may find very useful.
Follow this link for a step by step instructions on how to use this, but please come back and read the full description later.
Upgrading the Z88 to OZ 4.5 or later
Since Cambridge Computer stopped production of the Z88, the community has independently continued the development of the operating system and default applications, comprising many bug fixes of the original software, multiple international keyboard layouts, improved overall speed of the system and better serial port management. There are two ways that the standard Z88 can be upgraded to the latest OZ releases.
- Changing the Internal ROM
- Using the External Flash Card.
Changing the internal ROM is now a difficult procedure, as the original chips that were used are no longer available. Replacement chips may be used if modifications to the pin outs are changed.
Using an External Flash Card
All the other languages are supported and using an external Flash card in slot 1 is easy to fit, the Z88 boots off that device and ignores the internal OZ ROM altogether.
There are two sizes and types available. Which one to use depends on whether or not the user wants to use an additional RAM card. It is recommended the size chosen is greater than 128K. This makes the Z88 into an Expanded Machine (enabling more memory to be used for applications and creating a larger graphical map area).
- 1M Flash card
- 512K / 512K Flash/RAM card
The following description shows the recommended use of using the different cards together with information to boot the Z88 up using the new Operating System.
1M Flash Card
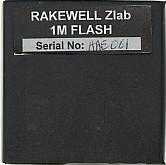

Open the card flap and slide the card into Slot 1.
Use an additional RAM pack in Slot 2. See Expanded Machine.
This leaves Slot 3 free for another Flash card or EPROM pack if and when desired.
The Applications and File Area are in the Flash Card
512K / 512K Flash/RAM Card
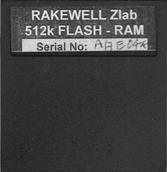

Open the card flap and slide the card into Slot 1.
As 512K of RAM is included in Slot 1, this is now an Expanded Machine. Slot 2 may be used for additional Flash cards, leaving slot 3 free for yet another Flash card or EPROM pack if and when desired. Using this card will also enable expanded mode (more RAM in slot 1).
The Applications and File Area are in the Flash Card
Note: Erased EPROMs
If the EPROM has been erased with the EPROM Eraser they are a blank space. It will not be recognised until the header has been re-blown into it with the Catalogue File Card command. See Section Seven - Filer reference.
This doesn't happen with Flash cards as they are able to be asked what they are even when they are empty.

Initialize the Cambridge Z88
Hard Reset
Do this by
| opening the CARD flap | Using an unbent paper clip, press the reset switch 2 twice, then |
|---|---|
 |  |
| shut the CARD flap | |
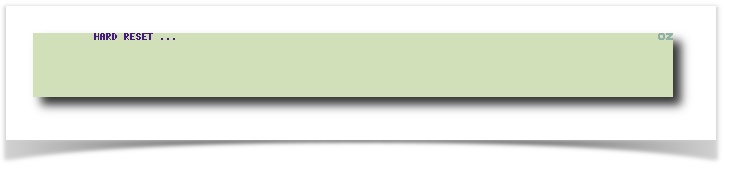 | |
HARD RESET should appear on the screen.
Must show HARD RESET
If HARD RESET is not displayed after adjusting the contrast (see below), there is no point continuing until this is corrected.
There are two mechanical switches, the card flap and reset switch. If these are faulty, this may be the reason why this is happening.
Removing the batteries and leaving the Z88 alone for 30 minutes can resolve this error.
Adjust the display

- Turn the contrast control as far towards the top of the Cambridge Z88 case as it will go (ie clockwise).
- The screen should display a dark blue rectangle.
- Gradually turn back the control until you can see the Cambridge Z88 screen clearly.
Has the Z88 booted up correctly?
The OZ 4.x index screen should now be displaying.

It is obvious that it is not running from its internal ROM as there should be UK just below the OZ symbol on the top right-hand side. If just the OZ symbol is displayed, then the internal ROM is still in control. Check that the OZ 4.x card is in Slot 1.
Check Latest Version
Whilst in the INDEX use the following command  INFO
INFO

If this display does either not appear, or has an earlier date than displayed, you have an older version. Please consider upgrading. See Appendix I - Creating / Updating an Application Card. More details may be obtained from the BLOG.
Changing keyboard layout
When the Z88 was sold in different countries, both the internal ROM and the keyboard was changed accordingly. With OZ 4.5 the language-specific parts of those ROM's have been integrated. The default language is UK. To match a different keyboard layout (which may still need to be changed mechanically,) use the additional command in the Panel, to change the ROM component if a different language is required:
- select the Panel
 S
S - move the cursor (with the
 keys) so that it is over the Uk to the right of Keyboard
 - change the language either by using
- J to toggle through all the languages or
- select a letter from this table.
| Letter | Country | Language | Displayed |
|---|---|---|---|
| U | UK (default) | UK | |
| F | French | FR | |
| D | Danish | DK | |
| S | Swedish | SE | |
| L | Finnish | FI | |
| G | German | DE | |
| A | American | US | |
| P | Spanish | ES | |
| I | Italian | IT | |
| N | Norway | NO |
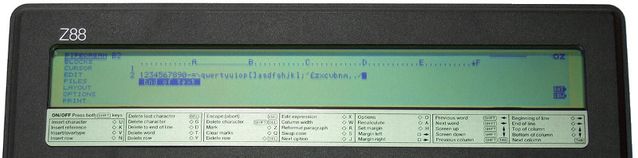
The selected keyboard layout (UK) is displayed just below the OZ symbol on the top right-hand side on all the screens as shown below.

The rubber keyboard may also need to be physically changed if the language chosen does not match the correct keyboard layout.
French Z88 Example
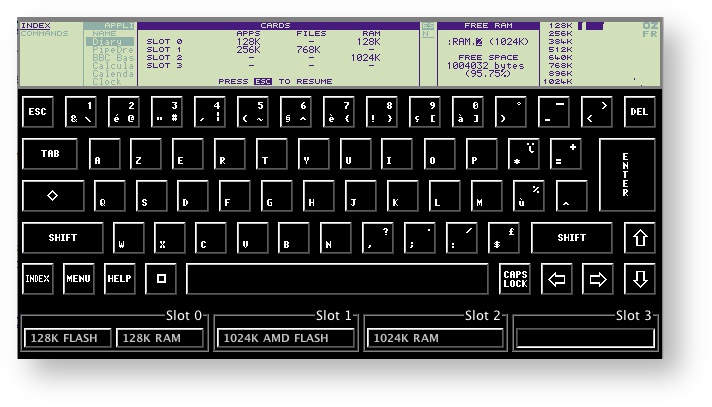
This example shown above shows the Z88 set to France showing
- the FR symbol just below the OZ indicating the change of Keyboard
- The French Keyboard Layout
- A 1M AMD Flash Card in slot 1 with OZ 4.5
- A 1M RAM Card in slot 2
- The CARD display showing how the cards are split between RAM FILES and ROM.
IMPORTANT: If the amount of RAM displayed does not match the amount of physical RAM used, the Z88 has not reset itself correctly. Keep doing HARD RESET(s) until they are the same. In this case, 1024K matches the 1M RAM card used, so it is correct. See Memory Chips - Testing and Results to test them.
Check the RAM
As stated above it is a good idea at this point to check that the Z88 cards, like the RAM and Flash cards have been correctly recognised by OZ. These are displayed in the CARD screen. To display the values, start in the INDEX screen which should already be displayed. If not
1. Hold down the key (at the bottom left of the keyboard) and press the I key, to enter Index. Alternatively it may be selected by pressing the  key at the lower left of the keyboard.

2. Press CARD

The CARD display has been changed to include the size of the file area and the amount of Free RAM that is available. This is a different example to the French Z88 Example and is what you would expect to see if you are using a 512/512 Flash/RAM card running OZ 4.7.1 in slot 1. The important numbers to note here are the ones displayed in the RAM column. 32K in slot 0 is the internal RAM and 512K is the correct amount in the 512/512 Flash/RAM card. If these numbers are slightly different than what is expected, do another Hard Reset to see if it has been corrected.
If the RAM value never reaches the expected value, there may be a RAM or a Card connector fault. See Memory Chips - Testing and Results to test them.
Set the Default Device
OZ makes an intelligent choice on which RAM it should set as its Default Device. This should normally be the largest RAM card you have. Make sure that you have enough RAM otherwise you will run out of space quite quickly. To see which device has been selected, the Panel needs to be selected.
Hold down the key (at the bottom left of the keyboard) and press the S key, to enter the Panel. Alternatively it may be selected by pressing the key at the lower left of the keyboard and then moving the cursor down to the Panel application and then Press  to select it.

The following screen will be displayed. If the Default device is the correct one shown, there is no need to change it. Get out of viewing this screen by pressing  to return to the previous screen.

If the Default device number has been changed, the following instructions regarding Select deVice in the Filer need to be followed.
Select Device
1. Hold down the key (at the bottom left of the keyboard) and press the F key, to enter Filer.
Alternatively it may be selected by pressing the key at the lower left of the keyboard and then using the  key, move the cursor down to the Filer application.
Press to select it.

2. Press SV to Select deVice or using the key, move the cursor down until that command is displayed in the COMMANDS window, then press to select it.
![]()
3. Move the cursor over to the right (using  , then press the
  key to remove the number that is there, finally type in the RAM slot number you wish to use and then press to select it.

Set the clock
Note: Eazylink has the facility of synchronizing the Z88 clock to the Desktop's date and time. This method is quicker than using this manual method.
1. Press T to enter the clock popdown.
2. Press to highlight the Set option:

3. Press to enter the Set function, which displays the previous (incorrect) date and time, and will allow you to alter these to their correct values:

You can move the cursor between the time and date with  and .
and .
You can also move the cursor left and right along the digits with the and keys. Moving off the end of the date will position the cursor on the time, and vice versa.
4. Having positioned the cursor, simply type the correct time or date, using the numeric keys 0 to 9. The format of the new time and date should not change; if you type over the '/' or ':' signs, move the cursor back with the key and replace them.
When you have set the correct values, press to confirm them, and after about two-seconds the correct time and date will be displayed.
Finally, press to exit from the Clock.
Try typing text
1. Hold down the key (at the bottom left of the keyboard) and press the P key, to enter PipeDream.

2. Type Dear Sir, at the keyboard. Press the key to delete mistakes. If you type more than will fit on one line, PipeDream will automatically lay out the text for you.

Switch off
There is usually no need to worry about switching your Cambridge Z88 off.
If you do not type anything for several minutes the machine will automatically switch off to conserve power.
You should always switch your Cambridge Z88 off before, for example, carrying it in a briefcase. This is because the keys may get pressed, disturbing what you were in the middle of doing, or keeping the Cambridge Z88 on and wasting the batteries.
To switch off press both keys simultaneously.
To switch the Cambridge Z88 on again at any time, press both keys simultaneously.
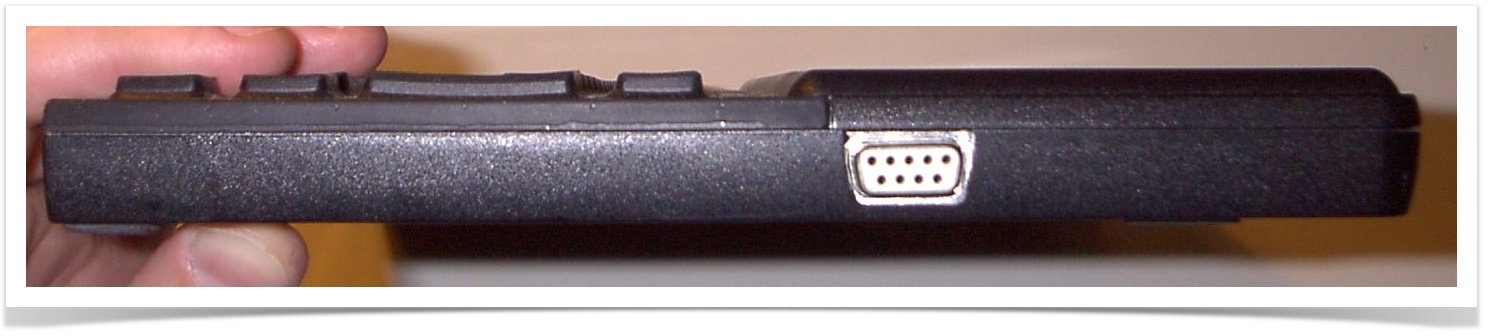
Power Supply Socket
This is the larger of the two sockets, about two-thirds of the way up the left-hand edge 1 allowing the Z88 to be powered externally.
Reset button
The reset button 2 is adjacent to the Power Supply Socket. It looks like another socket because it has been set right into the machine to avoid it being activated accidentally. It can only be reached by inserting a blunt instrument into the hole. The manufacturers recommend using an unbent paper clip.
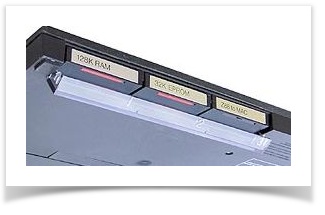
Card Slots
These are on the front edge of the machine, below and to the left of the space bar. This is where up to three additional cards may added for extra RAM, EPROM or Flash for other applications and local storage for files, It opens from the front downwards and outwards.
Definition
CARD = Add on memory or Application cartridge.

RS-232 Port
This is the large rectangular socket on the right-hand edge of the Z88, directly opposite the Power Supply Socket. This is used to connect the Z88 to other computers or Printers.
Do Not Use the same power supply with External devices using the RS-232 port.
The RS-232 Port's GND pin is the same as the 6v power for the Z88. This means that if, for example, if a printer was powered by the same power supply as the Z88, whilst connected to the RS-232 port, this will cause a short circuit. This has led to the track inside the Z88 to be blown like a fuse. To avoid this, two separate isolated power supplies should be used.
Stand
On the back of the Z88 opposite the screen on the front, is a large piece of plastic that hinges at the top to make a stand so that the machine no longer lies flat, but tilts towards you. This can make the screen more visible.
Battery Compartment
The opening for this is also on the back in the centre, just below the space where the stand folds away when not in use.