| Anchor | ||||
|---|---|---|---|---|
|
...
...
...
...
...
...
...
...
...
...
...
| Table of Contents |
|---|
There are a number of common statements that have been repeated in each of the manuals. To save space they have been put here.
You should make yourself familiar with this section before reading any other manuals.
 Manual conventions
Command | Instruction | |
|---|---|---|
In this manual, commands are as follows. | ||
This column is what you type. | This column is used when you need to press the enter key. | This column is used for comments. |
So when you see | ||
C: | -ENTER- | Move onto the hard disk |
cd \ | -ENTER- | Move to the root directory |
PCLINK | -ENTER- | Start the program. |
This means that you type these three commands to the computer. |
Specific keys will be shown within dashesas follows, (-ESC- -TAB- -SHIFT- -INDEX- -MENU- -HELP- and -DEL-) viz when -ENTER-
-
and
) viz when
appears, it means that the key marked ENTER should be pressed.
...
From the Application, enter the Filer by pressing -INDEX-
, and then
Change the device to :RAM.1 using the SELECT DEVICE command
Return to the Application by pressing the -ESC-
For example, suppose that the Default Device for PipeDream had been set to :RAM. 1 and a file had been saved from PipeDream to the Default Device, i.e. just the filename had been entered.. If the Default Device for a different Application had been set to :RAM.0, typing just the filename when specifying the file to that Application would cause a file not found- error. To specify the file correctly for the Application, it would be necessary to either type in the device as well as the filename (:RAM.1 /filename) or to change the Application's Default Device to RAM.1.
...
Directories can also be selected with the cursor. Move the cursor onto the desired directory name in either Z88 or PC window and press -SHIFT- and
. The window will 'move down' into the directory. To move back into a parent directory, position the cursor anywhere in either the Z88 or PC window and press -SHIFT- and
and
. The window will move 'back up' to the parent directory. If no files are present in the child directory, the name "PARENT DIRECTORY" will appear in the window so that this function can be performed.
...
The following commands can be used to mark files:
ENTER
...
Place the cursor bar on the desired file name using the cursor keys. Press -ENTER-. A chevron symbol appears, denoting that the file is marked.
Only one file at a time can be marked with -ENTER-. If the key is pressed again, the file is unmarked. Further files can be marked by pressing -SHIFT- and -ENTER-
and
together. See -See TAB-.
Note: If -ENTER- is is pressed while marked files appear in a window, all files in that window will be unmarked.
...
Place the cursor bar on the desired file name and press '-TAB-' . A chevron symbol appears, denoting that the file is marked.
Any number of files can be marked with '-TAB-'with . However, if the cursor bar is placed on a marked file and '-TAB-' and
is then pressed, the file is unmarked.
-ENTER-. (Ranger and Rakewell software only) Place the cursor bar anywhere in the relevant window and press
, followed by -ENTER-by
. All files in the window will be marked.
...
The two keys on the Z88 keyboard marked -MENU- and-HELP- allow the operator to access a comprehensive set of commands to perform all the necessary functions within an Application. When the -MENU- key
key is pressed a screen offering a range of menu commands is presented. If the command required is present on the screen, the cursor keys can be used to move the cursor to the command. If the -ENTER- key
key is pressed, the Application will perform the command currently highlighted by the cursor. If the required command is not present on the screen, pressing the -MENU- key will present a further page of commands. The -MENU- key
key can be pressed repeatedly until the required command is shown on the screen.
...
its diamond (
by highlighting the command on the commands list or
by highlighting the selected option in the menu, obtained by pressing the -MENU- key
HELP
Each menu command has a page of "help" text associated with it. To display the help text for any given command, it is necessary to press the -MENU- key key and use the cursor keys to move the cursor onto the command required. Then, by pressing the -HELP-
key instead of the -ENTER-
key, the Application will display the help text for that command.
-ESC- returns to the Application or to the INDEX (in the case of a pop-up) front screen. The cursor keys will display other help screens.
...
Some applications can share files with Pipedream require loading and saving files in as plain text files. The Save and Load commands (FL and
FS) in PipeDream displays a series of options, including one which allows the file to be saved in plain text format (without the embedded % codes), as shown below:
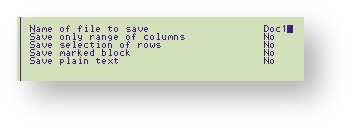
Press FS, or
FS followed by the file name. Move the cursor down 4 lines using the
, to the question, 'Save plain text'. Enter a Y for Yes and hit -ENTER-.press
If you intend to return the file to PipeDream then this option should remain set to 'No', so that PipeDream saves its embedded formatting codes. However, if the file does not need to be returned, or if the formatting is not required, the option can be set to 'Yes'.
...