| Table of Contents |
|---|
...
The important thing is that you have a copy of your files. See 'Using two Flash cards.'
The original EPROM Packs - no longer recommended.
Then there are several ways you can store the data as well as or instead of EPROMS. You could just use EPROMS while you are out and then one of the backups when you get home or back to the office.
...
Eazylink2 is the version supported on this site.
Cassette Tape - no longer recommended.
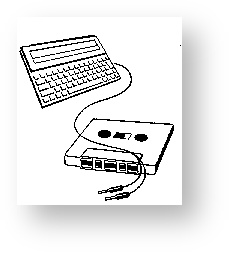 If you are on a tight budget and haven't got another computer then Z-Tape is the next `best thing' to use. Using this program you can store your files onto your cassette tape recorder. It is SLOW and depending on which Tape Recorder you use, it can be unreliable. Cassette tapes have been used on several computers in the past. It was a cheap way to store data when there were cassette tape recorders around, but they were not the most reliable.
...
Instructions for installing and using cartridges
RAM and EPROM
(Cambridge Computer leaflet)
There are two types of cartridges RAM and EPROM.
EPROMS are designed to function in slot 3, and RAM cartridges Preferably in slots 1 and 2. They will work in slot 3 but they will take more power from the batteries and you will not be able to use EPROMs.
The perspex cover on the front edge of the Z88 is hinged and if gently pulled from the top, will open enough space to allow you to insert your card(s). When you have inserted a card, with the label on the card facing the underside of the keyboard, then push the perspex flap back into position, i.e. fully closed.
IT IS EXTREMELY IMPORTANT TO REMEMBER THAT ONCE THE FLAP IS OPENED AND A RAM CARTRIDGE IS REMOVED, THEN YOU NEED TO RESET THE MACHINE, SEE PAGE 8 OF THE USER GUIDE. THIS WILL CLEAR ALL YOUR DATA IN THE Z88, i.e. 'RESET CLEARS MEMORY. THEREFORE, ONCE YOU INSTALL YOUR RAM CARTRIDGE, DO NOT REMOVE IT.
SIMILARLY, IF YOU PURCHASE A RAM PACK AND INSTALL IT AFTER YOU HAVE BEEN USING THE Z88 FOR A WHILE, YOU ARE STRONGLY ADVISED TO BACKUP ALL YOUR FILES ONTO AN EPROM CARTRIDGE FIRST. THE REASON IS THAT IN ORDER TO RECOGNISE THE EXISTANCE OF NEW MEMORY THE COMPUTER HAS TO BE RESET, THUS ERASING EXISTING MEMORY.
One other thing to remember is that RAM cartridges draw their power from the Z88 While the Z88 is on or in a sleep mode, your data is safe. If the Z88 is deprived of power (see pages 6 and 7 of USER GUIDE) then your RAM is also deprived of power, and will lose its contents.
REMEMBER that your EPROM Cartridge is the best method of archiving your valuable data files or programs, but once the EPROM is full, the recommended way to erase it (if required) is to me the UV EPROM ERASER from Cambridge Computer Ltd.
Now refer to page 74 of your User Guide at The Filer section on how to use your EPROM
Using RAM Packs
When you put a RAM pack into the Z88, it good practice to give your Z88 a HARD RESET.
If you are using a 1M RAM pack it is imperative that you do this as when the Z88 was designed, there were no 1M RAM packs to test it, so OZ (the Z88's operating system), sometimes doesn't recognize it correctly.
To check whether the Z88 has recognized it, you need to select the INDEX and then CARD.
The correct amount of RAM should be properly displayed, i.e. 1024K for the 1M RAM pack.
If it doesn't show this, you should do another HARD RESET until the Z88 recognises the right size!
EPROMs
The Header on EPROMs
After Erasing an EPROM, all information on it is removed including what is called the Header.
...
This corrects the file and the comment identifier works correctly (those lines are skipped by CLI).
BOOT.CLI Example
.; Here is a sample BOOT.CLI file.
.; Anything typed after a .;
.; at the beginning of a line is a comment.
.; You can use this to remind
.; yourself what you are trying to do,
.; so when you look at it
.; later on, you will understand
.; what you have done.
.; First we change the Default Device
.; on the Panel to use
.; RAM.1 (You can't use the Z88
.; very well using the internal
.; ram, :RAM.0)
.;
~As
.; []S Select Panel
.;
~D~D~D
.; Move down 3 lines with the Down Arrow key
.;
~C~R
.; Diamond Right Arrow to move to end of line
.;
~X
.; DELETE key to remove the 0
.;
1
.; Figure 1 put in to change to :RAM.1
.;
.; You could also turn the Keyclick On
.; (optional) if you prefer
~U~U
.; Move the cursor UP two lines
.;
Y
.; Type 'Y' for Yes
.;
.; *** End of Option ***
~E
.; ENTER key to save the changes
.; and leave Panel
.;
~Af
.; []F into the Filer
.;
~Csv
.; Diamond SV to Change Device
.;
~C~R~X1~E
.; from :RAM.0 to :RAM.1 (like before)
.; At this point you can
.; Add your Directories. I have
.; used a simple tree.
.; |
.; ---------------
.; | |
.; PIPEDREAM DIARY
.; |
.; |
.; |
.; ---------------------
.; | |
.; LETTERS SSHEETS
.;
.; At this point we're still
.; in the Filer, carrying on
.;
~Ccd
.; Diamond CD (Create Directory)
.;
PIPEDREAM
.; the name of it
.;
~E
.; followed by the ENTER Key
.;
~CcdDIARY~E
.; Create DIARY Directory
.;
~Csi
.; Diamond SI (Select Directory)
.;
PIPEDREAM~E
.; the name of it and the ENTER Key
.;
~Ccd
.; Create Directory
.;
LETTERS~E
.; the name of it and the ENTER Key
.;
~Ccd
.; Create Directory
.;
SSHEETS~E
.; the name of it and the ENTER Key
.;
~Csi
.; Select Directory
.;
~Cd
.; Diamond D Delete to end of line
.; (clear any text)
.;
~E
.; then do it (the ENTER Key)
.;
.; LOAD your Printer Driver (Optional)
.; First you need to FETCH FROM EPROM
.; a copy of your
.; Printer Driver File
.;
~Cef
.; Diamond EF (Fetch from EPROM)
.;
DRIVER.PDR
.; the filename
.;
~E~E
.; followed by TWO ENTER Keys
.; Now select the Printer Editor
.;
~Ae
.; Square E
.;
~Cfl
.; Diamond FL (File load)
.;
DRIVER.PDR~E
.; the filename and the ENTER Key
.;
~Cfu
.; Diamond FU (Update Driver)
.; *** END of Printer Driver Option ***
.;
.; Now all that remains is to select
.;
~At
.; Square T so that you can set the Time
.; and Date manually
.; at the end.
After you have used a BOOT.CLI file
...