Designing a party invitation
This chapter will explain how to:
- Type in text
- Make corrections to the text you have entered
- Create bold and underlined text
- Alter the layout of text
- Save the document
- Print the document
Starting PipeDream
This example shows how PipeDream can be used in a typical word-processing application. To enter PipeDream from the Index starting with a blank document, select PipeDream from the Index, and press the

Typing text
Type the following:
You are invited to a beano.
Notice that the cursor moves to the right as you type. The next character you type will always be typed at the position indicated by the cursor.
A short time after you stop typing, you will see the page map, on the right-hand side of the screen, change to show the new layout of text on your page.

Deleting
Press the
Word wrap
Type the word party and then continue to type the paragraph shown below. If you make a mistake, use the
When your typing reaches the right-hand margin, indicated by the symbol on the top border, just keep typing and PipeDream will automatically carry words over to the start of the next line.
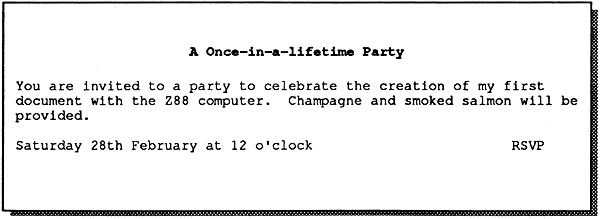
You are invited to a party to celebrate the creation of my first document with the Cambridge Z88 computer. Champagne will be provided.

Adding text
PipeDream starts in Insert mode, although you also have the option of working in another mode called Overtype mode. You can change modes with the Insert/Overtype command.
In Insert mode, text is always added at the position indicated by the cursor. You can add text simply by moving the cursor to the point where you want the text added, and then typing. The cursor is moved around on your document using the four arrow keys,  ,
,  ,
,  ,
,  at the bottom right-hand side of the keyboard.
Position the cursor after the word champagne, on the second line of the text you have just entered, press the space bar, and add the phrase:
and smoked salmon
The original text will move apart to make room for the new text, and words will wrap around to the next line at the right-hand margin to ensure that the altered text is correctly formatted.

Starting a new paragraph
After adding the new text press the
Press
Sunday 28th February at 12 o'clock.
You can use the

Columns
The page you are working on is divided into six columns, each 12 characters wide, shown by the rows of dots and the letters A to F on the top border of the screen. These provide the equivalent to tab positions on a typewriter.
With the cursor still on row 5, press the
RSVP
The text will be positioned near the right-hand side of the sheet, opposite the text already on row 5.

You can move to the previous tab position by holding down the
Replacing text
You can remove characters from the middle of a line by using the Delete Character command which you can give either using the EDIT menu, or by holding down the
S of Sunday with the cursor keys. Then, hold down the S will be deleted. Keep pressing Sunday is removed. Then, type in the word Saturday to replace it.Inserting a line
Now add a heading to the invitation. To do this, you first need to insert two blank lines at the top of the page.
Move the cursor up to the first line of your document, row 1, by pressing .
Now give the Insert Row command. You can do this either using the EDIT menu, or by typing  N. A blank line will be added where the cursor was, and the remaining lines of the document will be moved down on the page.
Type N again to give two blank lines at the top of the page. Then type in the following text:
A Once-in-a-lifetime Party

Adding styles to text
You can emphasise key phrases in your text by changing the style to bold, underlined or italics. This is achieved by selecting one of the highlight commands from the PRINT menu, or by typing one of the following highlight commands:
| Command | Effect | Highlight code |
|---|---|---|
| PUPBPI | for underlined text for bold text for italilc text | 1 2 4 |
Type the command once at the beginning of the text you want to emphasise, and give the same command at the end of the text you want to emphasise, to switch back to normal text.
To emphasise the heading of the invitation, move the cursor to the beginning of the heading with the key. Then type PB. A '2' symbol will be inserted before the text to indicate that a highlight code 2 has been inserted. Move to the end of the heading with the key, and type PB again. Another '2' symbol will be inserted. Now move the cursor down to the next line with the key and the heading will be displayed bold on the screen.

When you move the cursor onto the line containing highlights, the codes are displayed as highlighted numbers 1 to 8 so that you can edit them, or delete them, just like any other text characters. When you move the cursor onto another line, the effect of each highlight is shown on the screen, just as it will appear when printed out. (Italic text is displayed as tiny characters.)
Altering the layout of text
You can alter the layout of one or more lines of text in your document with one of the Align commands on the LAYOUT menu. For example, to centre a line of text, you move the cursor onto that line and then select the Centre Align command from the LAYOUT menu. Alternatively, you can type LAC.
Move the cursor onto the line containing the heading of the party invitation, if it is not there already, and type LAC. You will see the heading become centred on the page map (which always shows you the format of the page as it will appear when printed). The actual line of text will be centred on the document when you move the cursor onto the next line.

Saving your document
Once you have finished working on a document it is a good idea to save it as a file to the Cambridge Z88 RAM. You will then be able to find it again without difficulty at a later date, and there is the added advantage that documents saved to the filing system take up less space and are more secure than documents left within PipeDream.
You can save a copy of your document into the Cambridge Z88 filing system by selecting Save from the FILES menu:
Press the
MENUkey until the FILES menu is displayed on the screen.- Press the key to highlight the Save command.
Press
ENTERto select the Save command.
The Save command optionally allows you to save only part of your document, and therefore prompts with the following questions
| Name of file to save | |
| Save only range of columns | No |
| Save selection of rows | No |
| Save marked block | No |
| Save plain text | No |
Type in the name Invitation as the name of the file to be saved, so that the top prompt becomes
| Name of file to save | Invitation |
and press
A copy of the document will be saved with the name Invitation in the Cambridge Z88 filing system. You will see the file Invitation listed if you select the Filer by typing  F. Press
If at some stage you expand the Cambridge Z88 with a RAM card, you can save a document to the extra RAM by referring to it in the file name as, for example:
:RAM.1/Invitation
Loading a document
Try loading back the document you have just saved using the PipeDream Load command.
First clear the invitation from PipeDream by giving the New command from the BLOCKS menu. If you have altered the document since you saved it, the prompt
Overwrite text?
will be displayed at the top of the display, to give you the chance to go back and save your changes. Press Y to clear the document.
Then select the Load command from the FILES menu. As in the case of the Save command, fill in the file name in the list of options
| Name of file to load | Invitation |
and press
Printing the document
If you have a printer connected to the Cambridge Z88, you can print out a copy of the invitation with the following procedure:
Select the PRINT menu by pressing the
MENUkey until PRINT is highlighted on the Menu List.- The Print operation may already be highlighted as it is the first item on the menu; otherwise use the cursor keys to select it.
Press
ENTERto give the Print command.Press
ENTERagain to ignore the Print options and print the invitation.
You can repeat the procedure to print as many copies as you want.
To get bold and underlined text to print correctly you may need to use the Printer Editor; see Section Nine - The Printer Editor
What next?
You have just seen how the Cambridge Z88 makes it a simple matter to write text, correct mistakes, alter the layout, and print a document.
The Cambridge Z88 also enables you to compile a catalogue of information, as demonstrated in the next worked example.