Ranger Link2
| Introduction | Running RangerLink2 | |
| Commands | File Conversion | Which conversion should you use? |
| PC Link 2 conversions | PC Link II | Closing Down |
Introduction
Users of the unique Z88 notebook computer can now benefit from reliable, high speed communications with any PC or PC compatible. RangerLink2 allows file transfer between any device and directory in the PC and any device or directory in the Z88, using simple menu commands to select the files for transfer, either singly or in batches.
About RangerLink2
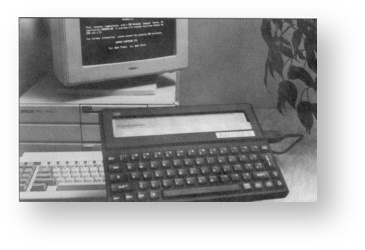
RangerLink2 is a PC to Z88 multiple file transfer package that is up to four times the speed of PC Link II.
The Z88 computer is often used as an extension of desk-top PC systems, allowing users to take data into the field and to bring back reports, notes and correspondence written "on the move". When used in this way, Z88 offers by far the best combination of size, weight and capability for the needs of typical portable computer users, especially when compared with bulky and expensive "laptop" computers.
Data is usually transferred between PC and Z88 by serial connection, using software on each computer to control the transfer. However, existing transfer packages suffer from slow data rates and can only handle one file at a time. RangerLink2 addresses these issues by providing a wide range of new facilities, including the ability to mark multiple files or the contents of entire directories for transfer in either direction.
RangerLink2 consists of an application EPROM for the Z88, together with a program disk (please specify whether 3.5" or 5.25" disk required) and a connecting cable. The application is driven from the Z88, which displays "windows" showing the current PC and Z88 directories, together with a command menu. Commands can be selected from either the menu or from "shorthand" functions, while a full list of all available functions is always available from the -MENU- key. RangerLink2 allows selection of device and directory on both PC and Z88, and files to be copied, renamed or erased.
The communication protocol used to communicate between the computers continuously checks for the connection, so that it is not necessary to start the programs in any order. If the RangerLink2 program is interrupted, for instance to use a different application in either PC or Z88, communication is automatically re-established when RangerLink2 is re-invoked. When file transfer is in progress, the Z88 screen shows a display of the file name currently being transferred, the file size, the progress of the transfer (in real time), and the number of files waiting in the queue. Filenames appear in the destination device window as they are transferred.
A useful feature of RangerLink2 is "View", which allows a quick look at the contents of any file on the Z88 screen.
Installation
The installation process consists of two distinct operations; that of installing the software on to the disk drive of the users PC and that of installing the application on to the users Z88.
PC Installation
The PC program is distributed on either a 3.5" or a 5.25" disc. The disc contains the following files:
- RANGERLK.EXE The RangerLink2 program
- PCLINK.EXE Cambridge Computer's PC Link program
- PCLINK.HLP Help file for PC Link
- IBMISO.EXE PipeDream to international (ISO) conversion
- ISOIBM.EXE International (ISO) to PipeDream conversion
- LTP.EXE Lotus to PipeDream file conversion
- PTL.EXE PipeDream to Lotus file conversion
- WTP.EXE WordStar to PipeDream file conversion
- PTW.EXE PipeDream to WordStar file conversion
- READ.ME
- SETUP.BAT
IMPORTANT. Before attempting to install or use RangerLink2, be sure to make a back-up copy of the distribution disk on either another floppy disk or your system's hard disk.
To install the RangerLink2 program on the user's PC, it is necessary to copy the program file from the distribution disk on to the hard disk of the PC. The program can be run by typing its name at the DOS prompt. For example to copy the file from the floppy disk in drive A to the hard disk drive C: on the PC:
C:\COPY A:RANGERLK.EXE -ENTER-
To run the program:
C:\RANGERLK -ENTER-
RangerLink2 can also be run directly from the floppy disk, if necessary. However, there is no space on the distribution disk for user files. Change to another disk before copying from Z88 to PC. Also, be sure to make a back-up copy of the disk first.
Fast PCs
If you are using a 486 DX 66 MHz (or faster) PC, the original RangerLink2 will not work reliably at these speeds. The way to get around this problem is either by
- Pressing the 'Turbo' button on the PC thereby slowing it down again,
- or by running RangerLink2 within Windows.
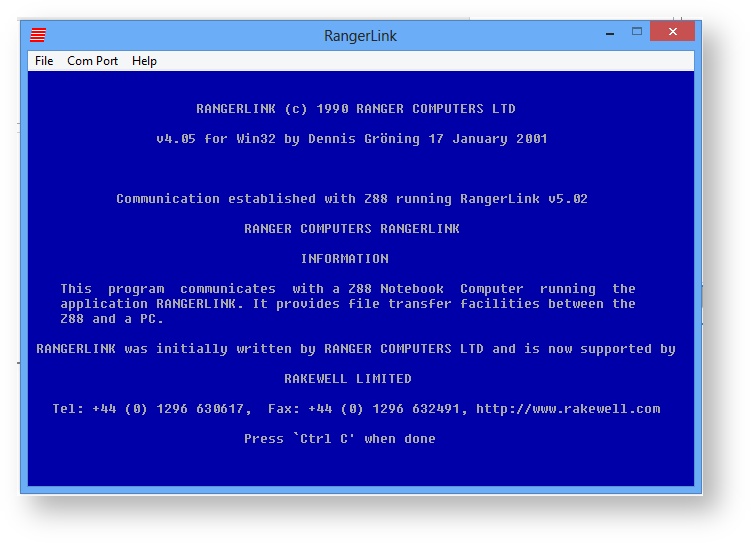
- or use a windows version v4.05 written by Dennis Gröning.
A Pentium PC was too fast for RangerLink2 to work on.
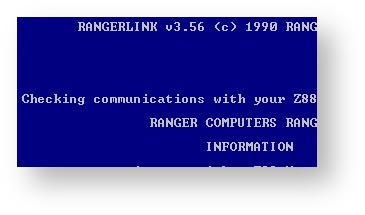
Screen shot of Ranger's v3.56 RANGERLINK program.
So Dennis Gröning re-wrote the PC end of it
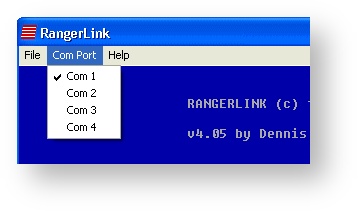
and expanded the number of COM ports it could be used with ...
NOTE version 4.05 is a Windows only program and works on faster computers.
Which COM Port?
When using PC Link or Ranger Link 2, the best COM port to use on your PC is COM:1. PC Link will only work on this port.
If you have your Mouse connected there, move it to COM:2. Windows will find it automatically whilst your DOS mouse driver command may have to be changed. To find out what the command should be, type
MOUSE /?
This should list the commands. Typically the mouse driver command can be
MOUSE /2
but check what it should be before changing it.
COM Port 2: Some users may still prefer to connect RangerLink2 to com port 2 on their PC. To do this, simply connect the cable to the relevant port and invoke RangerLink2 by typing:
C:\RANGERLK 2
Where the gap between RANGERLK and 2 is a space.
Z88 Installation
NOTE: RangerLink2 requires at least 128K of RAM expansion to be installed in slot 1 of the Z88.
See Fitting & Using the ROM in the "Read me First Section"
Using RangerLink2 with Windows
RangerLink2 is not a Windows application. However, it can be used from within Windows 3.1 by the following procedure:
Create a program item for RangerLink2 by selecting NEW in the Windows Program Manager dialogue box. Check the Program Item box (the default) and select 'OK'. The 'Program Item Properties' box appears.
In the 'Description' box, type the name program name as you wish it to appear under the icon, for example "RangerLink2". In the 'Command Line' box, type in the exact path and program name for RangerLink2, for example
C:\RANGERLK\RANGERLK.EXE
Choose the select icon box to select a suitable icon to represent RangerLink2. Finally, check 'OK'. The selected RangerLink2 icon will appear.
However, because RangerLink2 is a communication intensive application, it requires total machine resources and cannot co-exist with Windows when running. To allocate these resources, it is necessary to create a 'PIF' (Program Information File) about RangerLink2. To do this, use the 'PIF Editor', normally found in the 'MAIN' window.
When the PIF Editor dialogue box appears, make the following entries:
In 'Program Filename', type in the exact path and filename for RangerLink2, for example
C:\RANGERLK\RANGERLK.EXE
Under the heading of 'Execution', check the 'Exclusive' box. Finally, save the PIF file using the 'FILE' dialogue box, with the name RANGERLK.PIF. This completes the windows installation for RangerLink2. When invoked by double clicking on the icon, RangerLink2 has exclusive use of the system resources and is able to operate normally.
Running RangerLink2
It is not necessary to start the two programs, one on the PC and one on the Z88, in any special sequence. Once both programs are running and connected by the cable provided, they will recognise that fact.
| Command | Instruction | |
| On the PC | ||
| C: | -ENTER- | |
| cd \RANGERLK | -ENTER- | |
| RANGERLK | -ENTER- | This starts up RANGER Link on the PC. |
| Ensure Z88 is running . . . | The screen should show this prompt. | |
| nL or nZL | On the Z88 | |
| Place the cursor over the RangerLink2 Application on the Index page and press the -ENTER- key | ||
| PCLINK2 and Running | The screen should show these prompts. | |
Both the Z88 and PC should be running here | ||
| Command | Instruction | |
| On the PC | ||
| -ENTER- | This starts PC-Link and shows the main screen. | |
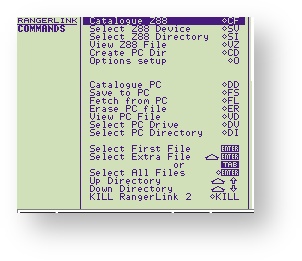
On entering RangerLink2 the user is presented with a screen display split vertically into three sections, known as windows. This screen is the main command screen and is the state of the display when RangerLink2 is waiting for the user to request an operation.
- The left window shows a list of the possible operations that may be carried out.
- The centre window shows a list of the files currently held on the Z88 in its Default Device and Default Directory.
- The right window shows a list of files currently held on the PC in the currently selected drive and directory.
- The cursor is positioned on the first possible operation in the left window. The possible operations are explained in detail below.
| Version Number | The version number is displayed at the top right-hand corner of the display. 5.02. |
| PC Access | Whenever the PC is being accessed a disk symbol is displayed on the right-hand top corner of the display. |
| File Transfer | RangerLink2 transfers one or several files from the Z88's RAM memory to the disk of the PC or visa versa. To make full use of all the facilities provided by RangerLink2, it is necessary to understand the way that files, directories and disks are implemented in both the PC and the Z88. For an explanation of the PC implementation, please refer to the PC User's manual. For an explanation of the Z88 implementation see "The Z88's Filing System" in the "Read Me First"section of this manual. |
If the PC is not connected, has no power or is not switched on, the message 'PC not responding' will appear in the PC directory window.
The execution of an operation is initiated in two steps.
Firstly, the file on which the operation is to be performed must be selected and secondly, the operation itself must be selected.
The operation will then be performed by RangerLink2. During the operation, status information will be displayed to show the progress so far and the further actions to be performed. When the requested operation has been completed, RangerLink2 will return to it's main command screen.
File selection
File selection may be accomplished in several ways. If an operation is requested without a file having been 'marked', RangerLink2 will request that the filename be typed in. This is time-consuming and limits the scope of any operation to only one file. A more flexible method of selecting the files on which RangerLink2 must operate is to 'mark' them. RangerLink2 will perform the required operation on each filename in turn.
Marking Files
See Marking Files in the "Read me First Section"
Operation selection
The user may select the required operation in one of two ways. Firstly, the four cursor keys may be used to move the cursor on to a particular operation. If the -ENTER-key is pressed, the operation highlighted by the cursor will be performed. Secondly, each of the available RangerLink2 operations has a special key sequence to access it directly. These key sequences are similar in structure to those used throughout the Z88 and all begin with the t key. The particular key sequences are detailed below.
Commands
| CF | Catalogue Z88 | VD | View PC File |
| SV | Select Z88 Device | FL | Fetch from PC |
| SI | Select Z88 Directory | O | Options (Format Conversions) |
| VZ | View Z88 File | Commands that don't work The following commands have not been implemented. Use the DOS or Windows commands on the PC after leaving RangerLink2. | |
| FS | Save To PC | ||
| DD | Catalogue PC | ||
| DV | Select PC Drive | ER | Erase PC File |
| DI | Select PC Directory | CD | Create PC Directory |
Catalogue Z88 CF
This provides a list of all the files on the current Default Device and Default Directory within RangerLink2 together with their respective creation dates, last update dates and sizes. The wildcard characters '*' and '?' can be used.
Select Z88 Device SV
The current Default Device is shown at the top of the middle window of the main command screen whenever RangerLink2 is active. This operation allows the user to change the Default Device to any available device on the Z88. When a new Default Device is selected, the Default Directory for the new device is set to zero.
The user can step through Z88 Devices by typing tJ. For instance, if the current device is :RAM.0, typing tJ will step to :RAM.1, and so on (Version 3.51 or later).
Select Z88 Directory SI
The current Default Directory is shown at the top of the middle window of the main command screen whenever RangerLink2 is active. This operation allows the user to change the Default Directory to any existing directory on the device currently selected as the Default Device.
Directories can also be selected with the cursor.
See Directories Selection in the "Read this First" section.
View Z88 File VZ
To enable the user to ensure that the correct file is transferred into the PC, this operation allows the contents of any file on the Z88 to be displayed on the Z88 screen. If necessary, the whole file may be viewed eight lines at a time. Pressing the -ESC- key at any point will end the operation.
Save to PC FS
RangerLink2 will transfer one or several marked files from the Z88 to the PC. If no file is marked, RangerLink2 prompts for file name of source file and destination file. Note that RangerLink2 will default to the selected device and directory if none is specified. Directory or sub-directory names may not be included in the destination name: they will result in a 'Bad Filename' message.
If the filename does not already exist on the PC, it will be created. If it does exist, it will be overwritten.
See Filenames in the Read this First section.
The Save to PC operation may be interrupted by pressing the -ESC- key. If the disk file is still being written, the result of this action will be to create a zero- length file on the disk.
During the transfer, which will take place at 9600 baud, RangerLink2 will show the amount of data that has been transferred together with the total amount of data to transfer.
Catalogue PC DD
This provides a list of all the files on the PC contained in the selected directory, together with their respective creation dates and sizes. Catalogue does not respond selectively to marked files. The wildcard characters '*' and '?' can be used.
Select PC Drive DV
The current Default Drive is shown at the top of the right-hand window of the main command screen whenever RangerLink2 is active. This operation allows the user to change the Default Drive to any available drive on the PC.
Select PC Directory DI
The current Default Directory is shown at the top of the right-hand window of the main command screen whenever RangerLink2 is active. This operation allows the user to change the Default Directory to any existing directory on the drive currently selected as the Default Drive.
Directories can also be selected with the cursor.
See Directories Selection in the "Read this First" section.
View PC File VD
To enable the user to ensure that the correct file is transferred into the Z88, this operation allows the contents of any file on the PC to be displayed on the Z88 screen. If necessary, the whole file may be viewed eight lines at a time. Pressing the -ESC- key at any point will end the operation. The file is not loaded into the Z88.
Fetch from PC FL
RangerLink2 will load a marked file or files into a file of the same name in the Z88 device and directory selected. If no file is marked, RangerLink2 prompts for source and destination filenames. Directory names may be included in the destination name, otherwise the selected device and directory name will be used.
If the filename already exists in the Z88, it will be overwritten. If it does not exist, it will be created. Fetch from PC may be interrupted by pressing the -ESC- key. If the Z88 file is still being written, the result of this action will be to close the file at the point that has been reached.
During the transfer, which will take place at 9600 baud, RangerLink2 will show the amount of data that has been transferred together with the total amount of data to transfer.
Note: On the PC, filenames can contain the characters #, ', ~, $, &, %, (, ), _, @@, ^, {, } and !. These characters are not permitted on the Z88 and are changed to '-' when files are copied from PC to Z88. In addition, PC filenames can only contain upper case alpha characters, unlike the Z88 that allows both upper and lower case. This difference can provide a useful indication as to the source of files in the Z88. If a file with lower case characters in the name is copied to the PC and then back to the Z88, the lower case characters will be converted to upper case.
File Conversion
The conversion options modify Z88 plain text files so that they can be easily imported into either WordPerfect, WordStar, or any word processor expecting plain ASCII text. The file is only modified to the degree that the line feeds and carriage returns are correct for each package - no attempt is made to convert highlights such as underlining or bold text, etc. or any paragraph formatting commands.
Before transferring the PipeDream file to the disk it must be saved as a 'Plain Text' file. This is done in PipeDream using theFS command, changing the filename to a different one and changing 'Save plain text' from No to Yes.
- TIP When changing the filename, you may find using the .ext to be helpful here. For example if your file was called 'GOODONE' you could change the plain text filename to 'GOODONE.PT'.
Please note that the conversion only works when saving, i.e. it is a one-way process. The conversion option is selected by entering the
Options command O
and highlighting the required selection with the bar cursor.
When any of the three conversion options are set, RangerLink2 puts a warning triangle in the OZ area on the right hand side of the display. This is to bring to your attention and file that conversion that may have been set accidentally or is no longer needed.
NB. You should normally leave the conversion options set to "NONE", the default setting. Files saved with conversion set will not re-load correctly into PipeDream on the Z88. So be sure to keep a PipeDream format copy on the PC disk for backup purposes as well as the converted file.
There are three types supported.
- ASCII
- WS
- WP
| Conversion None (Default) | This should be used when saving files that are going to be used with your Z88 or PipeDream files that will be used with PipeDream on the PC. Selecting any other conversion will display a warning triangle on the right of the screen to warn you that a conversion has been selected. |
| Conversion ASCII | This changes all the end of line characters to a Hard carriage return. |
| Conversion WS | This changes the end of line character within a paragraph into a soft carriage return and the end of paragraph into a hard carriage return. |
| Conversion WP | This removes all end of line characters within the paragraph and the end of a paragraph into a hard carriage return. |
Which conversion should you use?
The only way to find out which one to use is to try them and then note down which one worked best for you. If you find that you got something that you did not expect, that is not unusual. Different wordprocessors use different characters to do different things. I have not tried all these conversions out yet, so if you find any differences to what I think should happen, let me know and I will change this document to suit.
PC Link II conversions
There are additional programs supplied on the PC Link2 and RangerLink2 disk. See the PC Link booklet for further details.
PC Link II
For convenience, the RangerLink2 pack also includes the Cambridge Computer PC Link II communication software.
The operation of this software is described in the separate PC-LINK USER GUIDE included in the pack.
Closing Down KILL
The command KILL can be used whilst in RangerLink2 to close down the application.
Remember that all your settings from the Options will be reset to the default setting when starting up either application again.

